cPanel is a hosting control panel web software that allows users to administer servers through a web interface instead with addon features. cPanel commonly using web hosting provider and web development companies to host websites. In this tutorial, we will discuss the complete process of install cPanel/WHM on DigitalOcean Droplet or VPS. If you are thinking to start own web hosting server business than cPanel important for you because cPanel is the most popular hosting control panel.
Install cPanel/WHM on DigitalOcean Droplet or VPS:
I'm sharing this tutorial specially for DigitalOcean droplet but by using the same process you can install on any VPS or dedicated server.
Step 1- Choose droplet OS and Configuration, I recommend to choose CentOS with min 2GB of RAM and 20GB storage:
Choose: Centos > 2GB RAM (min) > Droplet Region
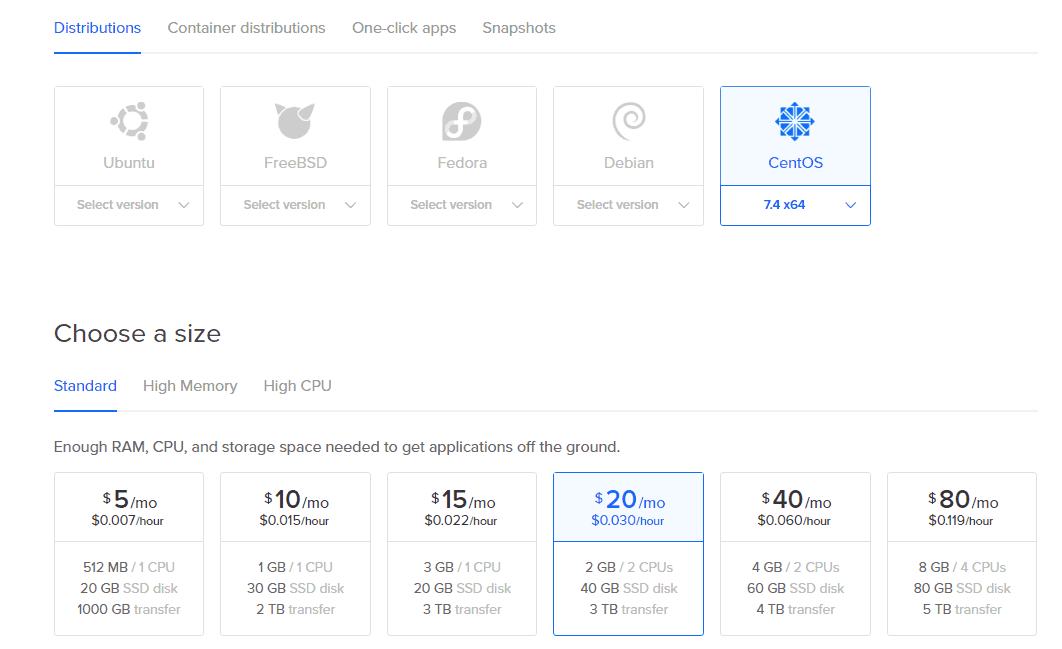
And click on create droplet and wait for few minutes till your DigitalOcean droplet ready.
Connect you droplet using SSH (Use Putty if you are a Windows user it’s easy and quick), you can also follow below tutorial (this tutorial no exactly for VPS but you can get the clue).
Connect your C panel server with SSH using Putty
I’m Linux user so I’m using bash command line instead of Putty, (You can also install Ubuntu on your Window machine on VirtualBox). let’s move on further steps.
To connect your droplet use below command:
ssh root@{droplet IP here}
Ex- ssh root@139.11.11.11
You may be forced to change your password in the first login. ( DigitalOcean sent default droplet password on registered email)
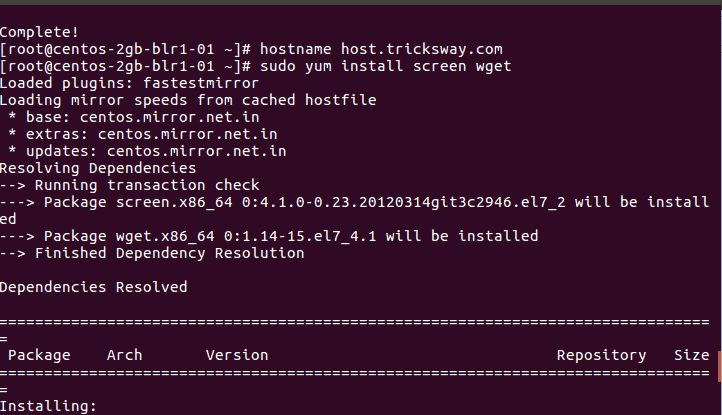
We have to check Perl status on server, use below command
sudo yum install perl

To prevent spamming cPanel is checking that it is installed on has a Fully Qualified Domain or not. Create a subdomain with your droplet IP if you have a good understanding of DNS else use temp hostname as following, you can change it later once cPanel installed on your server.
Enter a temporary hostname using the command:
hostname server.exmple.com
Install cPanel/WHM on DigitalOcean Droplet:
The process input for cPanel installation only has several steps, but complete installation will take a long time. We are using program "screen" here is not really required in the installation of cPanel, but it can be a very helpful addition to the installation process. It can be very useful if you have some issues with an intermittent internet connection or that you will need to pause the lengthy install process.
Move forward and enter the command:
sudo yum install screen wget
Once screen is installed, you can start a new session using:
screen
Now we will proceed to install cPanel with WHM
Use the command to install cPanel with WHM:
wget -N http://httpupdate.cPanel.net/latest
Install using the command if you need cPanel DNS only version else leave:
wget -N http://httpupdate.cPanel.net/latest-dnsonly
Now we have to request cPanel server for latest package downloaded, we can go ahead and start the script process:
sh latest
Now wait for around 2 hours to complete the installation process, will continue running in the background, even if you close out the of your system.

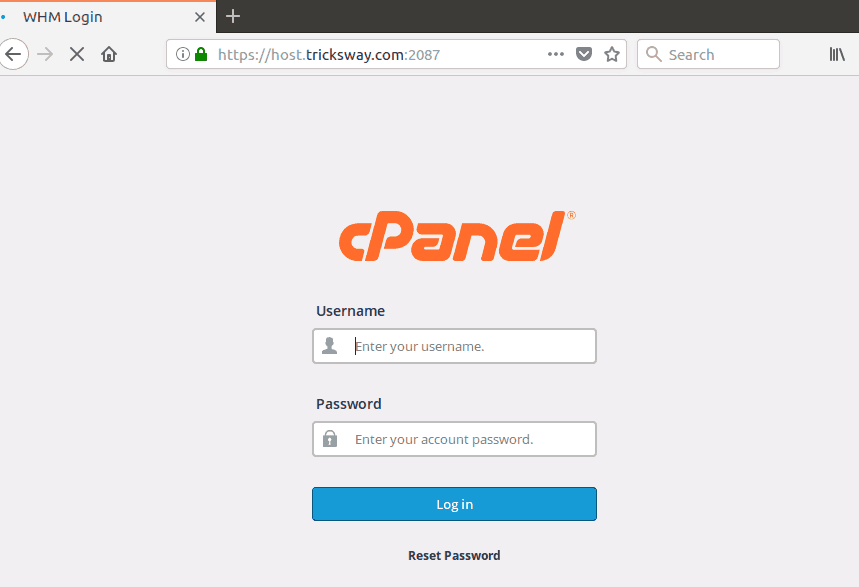
After the complete installation of cPanel, you can access your WHM for additional setup, log in by:
Your-IP:2087
Ex. 139.11.11.11:2087 or domain (host.example.com:2087)
username: root
password: your_password
Now your hosting environment setup is complete and you can create cPanel user/reseller or move the first step towards your hosting business.
GIVEAWAY: 10$ FREE DigitalOcean Credit

 About UsFind out working team
 AdverisementBoost your business at
 Need Help?Just send us a
 We are SocialTake us near to you,
One comment: On Install cPanel/WHM on DigitalOcean Droplet or VPS with CentOS
It was very useful for me. Keep sharing such ideas in the future as well. This was actually what I was looking for, and I am glad to came here! Thanks for sharing the such information with us.